Saturday, June 30, 2007

What happening to the microphones?

Not long ago, I was asked to attend a meeting at the government building in Cyberjaya. The meeting room looks very technical with all matching lights, comfy seats, equipped with good sound system, the room looks new and smells fresh.

The chairman was sitting at front with two other officers facing toward us. More than twenty people attend the meeting and waiting patiently to hear what the chairman have to say. I found my self a good sitting place and make my self comfortable before the meeting start. I’m ready and my ear is wide open and so as the others.

The chairman taps the microphone with his fingers to ascertain that it is functioning. Judging from the sound came out of the loudspeakers; the microphone level seems to be just the right level. The chairman begins to speak to address the opening of the meeting and few of the officer were being introduce to keep the other inform of their involvement to the subject being discuss.

Moment later during the discussion, the microphones suddenly starts to howl and a loud ear piercing feedback begins to oscillate. Yes, it is the the most common problem of all, the famous feedback, howling kind of sound continuously coming out of the speakers. The annoying sound was so intense and loud that everyone covers their ears with their hands.

A person who was sitting at the front was so disturbed that he moves to the back seat. There's no point really. Every way you sit is the same. There is no different in sound level because the room is of round shape and sound is distributed evenly to all direction.

The microphones keep giving feedback intermittently. Despite the technician made adjustment on the sound system, the problems are still audible and very persistence.

Some of us have no choice but to endure the irritating howling of the audio system. What is actually the problem here? Is it because the equipment it self or the human operator? In normal practice (provided the audio equipment is well maintain), there’s actually nothing wrong with the audio equipment. My guess is both of the above reason is at fault.

To be able to solve or rectify audio problem especially when in a situation such as this, one must have a through understanding of the subjects matter. One must know basic fundamental of sound especially when dealing with microphone used for speech.

It may look and sound simple but it not. Any sound system issue should be handled carefully. The situation should have been easily handled by a competent technician if he/she knows how to deal with it. Rather than have to guess or wonder why? The technician can actually be able to control or minimize the problem on the spot if they know what is going on, know how the problem occurs, where the problem start, and so on.

I guess most of us take it for granted in dealing matters pertaining to simple usage of microphone for speech. It only a simple audio system, what can go wrong one may says with confident. You can actually make a different and isolate yourself out of the pack if you understand sound engineering better.

The first principal is to make the music come alive. This also means real, beginning with no effects, no EQ, no compression-limiting, simply relying on microphone technique, musician and instrument placement, and natural room reflections. Only from this initial starting position can the correct use of effects, EQ and compression-limiting enable one to create the desired outcome. This can be looked at in 3 parts.


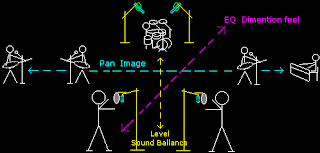
1 Balance relation of loudness of each instrument and voice to each other.
2 Image pan positions (left - center - right) of each instrument and voice.
3 Dimension managed by EQ and effects, placing instruments and voices forward or back.

The following descriptions assume a basic background of using of mixers, EQ equalization, graphics, parametric, effects, microphones, leads connectors, power amplifiers and speakers.
1. Block Diagram and Flow Charts

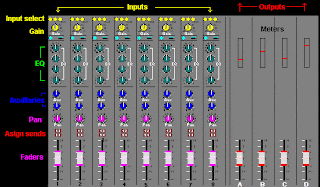
Mixing desks have basic features in common but each feature can vary in complexity. The inputs may or may not have phantom power available for microphones with internal pre-amps. The EQ may be a simple (bass and treble) control similar to domestic sound systems or a complex parametric system that allows for any band of frequencies to be selected and adjusted. The auxiliary sends may or may not be switched pre or post EQ, and or pre or post fader etc. Some mixers have 1 or 2 independent stereo input channels whereas other designs require 2 separate channels to be used with an external locking bar for grouping 2 faders. Mixing consoles in recording, film and TV studios may be modified after purchase to enable a greater range of flexibility.


All mixers are supplied with a block diagram sometimes described as flow charts. A flow chart or block diagram is not an electronic circuit, but a representation of the circuit layout. It is essential to understand flow charts to be able to know what functions the mixer has and the order in which the functions are arranged. Flow charts also show what parts of the mixer can be externally accessed or separated, and which parts are not accessible.

(a) Balanced Inputs The example flow chart below, of a single channel shows that the input can be selected for a balanced XLR mic or a line level jack plug. Balanced means that the mic signal is between XLR pins (2 and 3) and are not referenced or common to earth. This is done to stop electrical noise interference between earth and signal pins from being amplified. The balanced input circuit only responds to the signal between pins 2 and 3, and does not respond to interference noise which is common to the signal pins and earth.

The line input (jack) signal is attenuated (reduced) to a lower level similar to the mic level. In more complex mixer designs the line input has a separate pre-amp. A separate line level pre-amp is the best option.

A balanced isolation input transformer (TX) stops cable noise and other electronic interference from getting to the first pre-amp. Many mixers use a electronic circuit to achieve a similar result. The transformer is best option.

The first pre-amp also changes the input signal from balanced to un-balanced to be processed within the mixer. The signal is only made balanced again when re-sent from the mixer.

(b) Phantom power 48V is a technical trick to switch a supply voltage for powered mics to the XLR signal pins (2 and 3). This saves using extra wires or an external power supply and the reason for describing it as phantom power. This will be explained in more detail on the mic and cable pages.


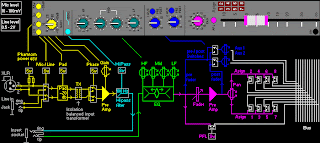
(c) Phase switch The phase invert (Inv) switch is essential to manage different mics to insure they are in-phase when used collectively, eg. a drum kit. However there are interesting techniques of 2 mics that are used out of phase to create acoustic comb filter effects. Another technique is for live application where 2 mics are placed on top or beside each other and the vocalist only sings into one mic at close range. If the mics are out of phase the common background spill will be minimised.

(d) Gain Each channel has an input gain control. The pre-amp gain (volume) control increases the small mic signal (approx 10mV) up to line level (approx 1V). Fully clockwise increases the mic input signal X 100 (+40dB). This allows the input signal to be adjusted for the main fader to be put into the correct operating position.


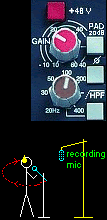
(e) -20dB Pad Mic level is approx 10 - 100mV (1/100 - 1/10 Volt) Mixers have a -20dB Pad attenuation switch which reduces the incoming signal level to 1/10 (-20dB). This is required to avoid the first pre-amp from being overloaded (clipping) especially for dynamic mics with very loud singers at close range and mics placed close to drum kits.

Some loud pop singers only perform with the mic at or in their mouth. Screaming at close range and can cause a dynamic mic to produce 1V which can easily overload and distort the input stage. A simple recording trick is to allow the singer a mic to scream into at close range that is fed back to their headphones. The separate recording mic is placed at a correct distance, sometimes without the pop singer being aware.

(f) Hi-Pass Filter HPF limits low frequencies below 100Hz, to stop vocal popping and bass rumble. Some mixers allow the hi-pass frequency to be adjusted; this also is the best option.

(g) Insert jack The signal from the HPF is made available at an insert jack. This allows the signal to be processed through an external effect unit and then returned to the mixer EQ. Some mixers have extra inset jacks pre and post EQ and main fader.

(h) EQ equalization can be a simple bass treble or complex parametric, which allows frequency bands to be selected and adjusted.

(i) Aux The auxiliary outputs are independent and can be switched pre or post main fader. Some mixers have many Aux sends. Some auxiliary sends are dedicated to pre or post fader including pre or post EQ, and some mixers allow the Aux sends to be switched from the different locations. The latter is essential for foldback which does not require the EQ that is selected for the assign recording output from the main fader.

(j) PFL The pre fade listen, or solo switch is beside the main fader. Some mixers enable the PFL function to be switched pre or post EQ. Some professional mixers have an independent VU or peak meter for each channel. But most basic mixers only have meters for the outputs. The PFL switch will connect that channel directly to one of the output meters for monitoring its level. As the EQ can change the channel level it is essential to check that the PFL is reading the post EQ position for the meter reading to be correct.

(k) Main fader and assign The fader pre-amp returns the signal to line level at the pan control, then to the 8 output selector switches (left 1,3,5,7) (right 2,4,6,8). All bus lines are sent to the output stages of the mixer and are also simple to follow.

Assign management and layout differs on each mixer. The above channel allows the operator to decide which of the output bus each channel is assigned to and for which purpose it is used. Some mixer designs assign the pan output to a separate A B or stereo bus.

www.soundcraft.com/mixing/basics
www.sound.westhost.com/mixer/technical

Reference:
Lenard Audio at  www.lenardaudio.com

Speaker Construction

The construction of speakers is approached in the same way as musical instrument making. Fine tolerances and attention to detail make large differences to performance. Large musical instruments and speakers suit low frequencies and vice versa. Each speaker and instrument can only function efficiently with linearity, within 3 octaves (octave is ratio 1:2). Theoretically a single speaker would have to change diameter from (1in - 24ft) (20mm - 8m) to maintain similar level and dispersion over the frequency spectrum.


The majority consist of paper or plastic moulded into a cone shape, loosely suspended in a frame so as to easily move back and forth to vibrate the air. Glued to the back of the cone is a coil of wire (voice coil) within a strong magnet field. Passing electricity through wire causes a magnetic field around the wire, which attracts or repels, causing the cone to move back and forth. The larger the magnet and voice coil (BL) the greater the power and efficiency, if well made. Externally vibrating the cone will cause the voice coil to generate electricity. A speaker can work well as a microphone especially for bass drums.


The energy of the magnet is conducted through the mild steel pole plates and pole piece, and concentrated (north - south) across the gap. Hopefully the voice coil has been perfectly centred in the gap. The clearances are very very small, less than half a bees dick. The smaller the gap - the more intense the magnetic field - the greater the efficiency. The slightest variations in alignment, during manufacture, cause large variations in performance. No two speakers or musical instruments can be identical.

Voice Coils. Passing electricity through wire causes a magnetic field around the wire. Changing polarity of the electric current through the wire, also changes the polarity of the magnetic field created around the wire. The interaction of the two magnetic fields, causes the voice coil, to be pushed out of the gap, forward or backward, depending on the polarity of the electricity through the voice coil.


Reference :

Lenard Audio at http://www.lenardaudio.com/education/

How to Eliminate Feedback

Audio feedback is the ringing noise (often described as squealing, screeching, etc) sometimes present in sound systems. It is caused by a "looped signal", that is, a signal which travels in a continuous loop.
In technical terms, feedback occurs when the gain in the signal loop reaches "unity" (0dB gain).
One of the most common feedback situations is shown in the diagram below - a microphone feeds a signal into a sound system, which then amplifies and outputs the signal from a speaker, which is picked up again by the microphone.

Of course, there are many situations which result in feedback. For example, the microphone could be replaced by the pickups of an electric guitar. (In fact many guitarists employ controlled feedback to artistic advantage. This is what's happening when you see a guitarist hold his/her guitar up close to a speaker.)
To eliminate feedback, you must interrupt the feedback loop.
Here are a few suggestions for controlling feedback:
  • Change the position of the microphone and/or speaker so that the speaker output isn't feeding directly into the mic. Keep speakers further forward (i.e. closer to the audience) than microphones.
  •  Use a more directional microphone.
  • Speak (or sing) close to the microphone.
  • Turn the microphone off when not in use.
  • Equalise the signal, lowering the frequencies which are causing the feedback.
  • Use a noise gate (automatically shuts off a signal when it gets below a certain threshold) or filter.
  • Lower the speaker output, so the mic doesn't pick it up.
  • Avoid aiming speakers directly at reflective surfaces such as walls.
  • Use direct injection feeds instead of microphones for musical instruments.
  • Use headset or in-ear monitors instead of speaker monitors.
You could also try a digital feedback eliminator. There are various models available with varying levels of effectiveness. The better ones are reported to produce reasonable results.
Other Notes:
Feedback can occur at any frequency. The frequencies which cause most trouble will depend on the situation but factors include the room's resonant frequencies, frequency response of microphones, characteristics of musical instruments (e.g. resonant frequencies of an acoustic guitar), etc.
Feedback can be "almost there", or intermittent. For example, you might turn down the level of a microphone to stop the continuous feedback, but when someone talks into it you might still notice a faint ringing or unpleasant tone to the voice. In this case, the feedback is still a problem and further action must be taken.

The desired Sound Pressure Level (SPL) at a given distance

This calculator provides the required electrical power (power output from the amplifier) to produce a desired Sound Pressure Level (SPL) at a given distance, along with an amount of headroom to keep the amplifier(s) out of clip.
Example:

You are designing a system where the farthest listening position from the loudspeaker is 100 meters, and the desired Sound Pressure Level is 85 dB SPL The loudspeaker chosen for the job has a sensitivity rating of 95 dB. With the minimum recommended amplifier headroom of 3 dB, then you need to choose an amplifier that can supply at least 1,995 watts to the loudspeaker.
Equations used to calculate the data:
dBW = Lreq - Lsens + 20 * Log (D2/Dref) + HR
W = 10 to the power of (dBW / 10)
Where:

Lreq = required SPL at listener
Lsens = loudspeaker sensitivity (1W/1M)
D2 = loudspeaker-to-listener distance
Dref = reference distance
HR = desired amplifier headroom
dBW = ratio of power referenced to 1 watt
W = power required

Reference :

Amplifier Power Required by Copyright © 2002 - 2007 Crown Audio®, Inc.

POWER AMPLIFIER RATINGS

Technician and audio operators always asked me how to choose the correct size of amplifier to use for a particular loudspeaker. The answer is not that easily answered, it depends on the thermal/mechanical limits of the drivers and the crossover components. It also depends on the input signal: its peak/average ratio. However there’s an easy way we can determine roughly the size of amplifier. The following example will show you how.

Firstly, we look at the loudspeaker rating, especially the program power rating (refers to loudspeaker spec). What we are going to find out is the OPTIMUM size amplifier power.

Example, Let say we have a loudspeaker with a 500W program power rating. So the recommended power amplifier we are going to use is in the range of 400w (multiply 500W with 0.8) to 625W (multiply 500W with 1.25).
Based on the calculation done, we have a choice to choose an optimum size of amplifier power between 400 W to 625W to drive the 500W loudspeaker.

You may say, how did he come up with the formula to calculate the power of the amplifier. Well the answer is actually, a research is done by Community Professional Loudspeaker to match loudspeaker with the correct optimum size amplifier power.

You can find out more by visiting the manufacturer website at : http://www.loudspeakers.net/main/

Thursday, June 28, 2007

Microphone or Line level Cables

How to analyze what happens when using longer microphone or line levels cables. The following calculation are based on maximum or worst case senario. The numbers have been rounded off to for simplicity. In this example the lengths are in feet. To get the most out of audio system requires some mathematical calculation and there is no easy way to do it. Notice that two of the most common electrical formulas show up : Ohms Law & Reactance Formula.

Note: dBu figures are referenced to 0 dBu = 0.775V

LOW LEVEL SIGNALS:

There are three things that need to be considered when driving long cables:

a) The length of the cable.

b) The cable capacitance between the conductors.

c) The output impedance of the device driving the cable

You can calculate the high frequency cutoff (-3 dB ) by:

- 3dB Frequency = 1 / ( capacitance x Output Impedance x 2 x Pi)
or
- 3 dB Frequency = 1 / ( Cable length x Capacitance perunit length x output Z x 2 x Pi)

Example :
Let say you have 100 Ohm microphone on a 500 foot cable. Capacitance per unit length is 32 pf. therefore,
- 3 dB Frequency = 1 / ( 500 x 0.000000000032 x 100 x 2 x 3.14 ) = 100 kHz.

Reference :
Chuck Mc Gregor, Community Professional Loudspeakers.

Friday, June 22, 2007

Amplifier - dB Calculation

There are two important dB calculation for amplifier output.

  1. How many dB SPL between two wattage levels.
  2. The difference in watts that need to be achieved for a given change in dB SPL.

WATTS TO dB ( Watts to SPL):

You want to change a 100W amplifier to 350W amplifier. How many more dB you can get out of your loudspeaker?

Answer : dB = 10 x log ( watts 2 / watts 1) or 10 log ( 350/100) = 5.4 dB